Wednesday, January 31, 2007

Broccoli and Mushroom quiche


Most kids I know hate broccoli. I have never had a problem when it comes to making you and your siblings eat broccoli.

Buy fresh broccoli, whenever you can. Always make sure that the flowerets are not turning yellow . That is a sign of aged! broccoli.

Ingredients


I head broccoli

1/2 cup button mushroom sliced.

1/2 cup cheddar cheese grated
3 eggs

1 cup cream

1/2 cup milk

1/2 t spn salt


Place a large pan of water on fire and bring it to boil.

Wash the broccoli under running water.

Separate the broccoli in to small flowerets and boil for 7 minutes. Drain.

Beat the eggs, add the cream, milk, cheese and the salt together.

Mix in the broccoli and the mushroom

Pour in to the quiche crust(instruction below)

Bake at 375 degrees for 40 minutes

Quiche is ready, when you insert a knife in the middle of the quiche and it comes out clean.

'Rest' (keep it aside) the quiche for 15 mints before serving.

Quiche


Actually it is me who likes to eat quiche and because I cook this often, even you like to eat it.

When I was expecting you, Kochamma came to visit me and we went to Ampang for shopping. We had a nice banana leaf lunch at Uncle Mathai's shop and after that we went to Ampang point, because Kochamma wanted to go to the beauty salon. Just as I entered the mall, I could smell quiche being baked somewhere. I rubbed my big, huge, giant belly and told Kochamma I am famished and I will not take another step till I get a slice of quiche! (ofcourse I could bully her because I had the car key!!)

I made your poor Kochamma search the entire Ampang point shopping mall and find who was baking Quiche! She finally found it..at the delifrance! In other words, you were eating quiche even when you were in my tummy!


In order to make a good quiche, you need to know how to make a good crust.


Two Rules you must follow

*Do not knead the dough too much

*Make sure the water is very very cold.


Recipe for the base/crust


1 1/3 cup plain flour

1/2 cup crisco

1/2 t spn salt

3 tbl spn of cold water.


In a bowl mix the flour and the salt, then add the crisco and gently mix it. Once the crisco is mixed with the flour, the flour should look something like soft bread crumbs. Now add 1 tbl spn of cold water, mix it with a fork. Do not use your hand.(the heat from your hand will melt the crisco and toughen the dough!), continue to add the remaining 2 tbl spn of water and mix well. Now use your hand and form the dough in to a ball.
Roll the dough to 1/4 inch thick.
Line the pie plate with the pastry

Flute the edge.(using the thumb and index finger,gently press the pastry all around the edge )

Now the base is ready.
There are two ways to bake the quiche. One you bake the crust first and then add the filling, the other one is bake the crust along with the filling. Mama prefers the latter! ( less hassle!)
If you have leftover pastry, store it in a zip lock in the freezer. You can use it to make trellis pattern for fruit pies, or roll the left over pastry thinly, cut in to diamond shapes and deep fry..You get nice diamond cuts..

Tuesday, January 30, 2007


I realized, I haven't taught you the names of all the dhals we usually use for cooking.
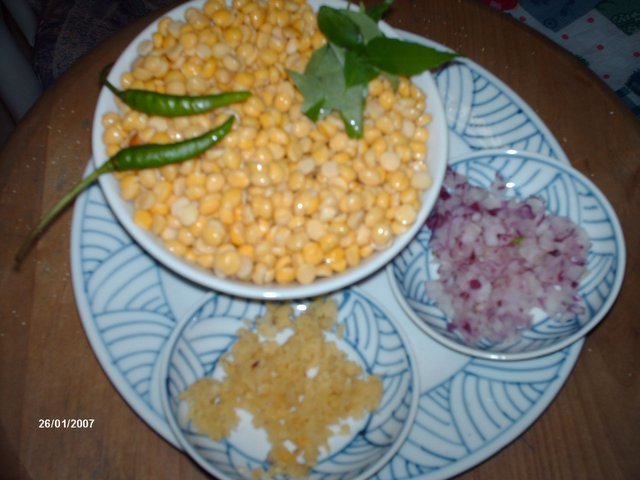
The above photo shows all the dhals in mama's pantry.
Let us start from the top, clock wise direction.

Chickpeas.( white and brown colour)
When you were little you always called it pick cheese. You loved to eat pick cheese and Bhatura.
White chickpeas is softer when it is cooked than the brown chickpeas. That is why mama doesn't cook the brown Chickpeas often.
You can also buy chickpeas in a can( garbanzo beans). Rinse it well before you cook.

Chana dhal
This dhal comes in so many different sizes. In Malaysia, we have Australian chana dhal and Indian Chana dhal. I still haven't figured out the difference. As long as it looks almost the same as it is in the picture, you can make parippuvada with it.

Green gram
You cannot get this dhal wrong. Like the name suggests, it is green in colour.

Greengram dhal

When the green skin is removed, you get the yellow dhal inside, it is called green gram dhal.. good for making payasam or lentil curry

Black gram
This dhal comes in three version. Fully clothed, semi clothed and completely naked.
Fully clothed ie with the black skin... used mainly for making dhal maharani
Semi clothed, ie it is split and still has a bit of the black skin... Use it for making idli( will teach you later how to use it)
naked...see the mysteries of the universe.. the black gram has white dhal inside.. use it for making idli and dosai.

Green peas
Because it requires prior soaking before I can cook, I do not cook green peas often.. Inji aunty has an excellent green peas curry recipe.. The recipe is saved in mama's recipe file. If you can't find it, you can check her blog http;//myinjimanga@blogspot.com

Masoor dhal
This reddish pinkish dhal is mama's favourite. It cooks very fast and you can make excellent lentils curry using this dhal..

Yaya, when you do grocery shopping at an Indian store, you will be overwhelmed with the choices of dhal. Since all dhals are edible, have no fear. Buy whatever fancies you... and cook..
Posted by Picasa

Saturday, January 27, 2007

Fresh home made parippu vada!
If you think you will not eat all the vadas you made, fry the vada till it is lightly browned, drain and cool it .
Wrap in Glad freezer wrap and freeze. When you want to eat it, you can fry it again in hot oil.( you don't have to defrost..Just like you cook nuggets) Posted by Picasa

Parippuvada

This was your great grandmother's favourite frittters, so is mine. When you were born, I was hoping you would like to eat it too and I remember making this one day when you were about 18 months old. You took the first bite and spit it out the next second. I was so disappointed. You refused to eat it till you were 5 years old. I remember that day very well. We were shopping at the pasar malam in Bangsar and I bought the vada from Lotus restaurent. You asked if you could have a bite and I gave you a small tiny bite, thinking that you are going to spit it out anyway. You finished all the vadas in the packet(4 vadas!!)and I knew my Ammachi would be smiling in Heaven!

Parippuvada is easy to make at home. But remember there are few rules to follow when you heat oil to deep fry.
1. Use either sunflower oil or corn oil, they have higher boiling point, and are ideal for deep frying
2. Oil gets heated up fast. Do not leave oil on fire and yack on the phone!
3. If the oil did get very hot, take the pan off the fire and let it cool
4. If the oil got very very hot and you can see flames, Don't add water to douse the flames, water makes the oil float and help to burn the whole house down. Don't panic, just use a lid and close the pan. The lid limits the air entry to the pan and as you know fire needs oxygen.
Take the pan off the fire and remember Mama told you never to leave oil on fire Unattended! and you Disobeyed. bad, bad girl!

Ingredients

All that you see in the photo
1 cup Channa dhal
1 inch ginger scrapped and chopped
2 shallots chopped fine
2 green chillies (remove seeds)
5 curry leaves cut in to tiny pieces.( not the sprig,,just the leaves).

Soak the Chana dhal in warm water for 3 hours.Drain and keep aside for 30 mints.
Pound the dhal along with onion, ginger, greenchillies and the curry leaves using the pounding stone. It doesn't have to be too fine. Look in the photo below, you can still see bits and pieces of the dhal. Add salt. Mix well.

Form in to patties and deep fry.
If you find it difficult to form the ground mixture to patties, then you didn't pound the dhal well! Pound the mix again!
Do not add water at any time during the process of pounding or mixing
Posted by Picasa

Friday, January 26, 2007

Waffle

Do you remember all those times we used to take the LRT and go to Masjid India, just to visit the Semua house and eat waffles? It was so difficult to find a car park near Semua house, and I had to park the car near the Hang Tuah LRT station and we took the LRT from there to Masjid Jamek!
You always loved to stand on the seat and watch the buildings whizzing by. I used to look at you and think, how did this ever happen? How did I manage to get the most prettiest baby in the world as my child?

Before I teach you how to make waffles, there are few things you need to know about the waffle iron.
Mama's waffle iron is 58 years old, and at that time they were not very particular about safety! The exterior of the waffle iron( it is made of Chrome) gets very hot and under NO circumstances will you touch the surface!.

Second thing you must do: After using the waffle iron, turn off the power, and let it cool. Once the plates are cool, take it off, wash it well and put it back on the waffle iron. Now you Must turn the power on and heat the plate again. This would prevent rusting of the cast iron plates and your waffles would never stick on the pan.

There are three recipes mama follows to make waffles. First one uses only one egg, but takes time to make as you have to beat the egg white( Mama makes this, when I am really angry.. beating the egg white for 15 minutes usually takes all the anger away). second one is easy, just mix all the stuff, third one uses yeast and takes an awfully long time to get the batter ready.( I usually uses this recipe to make school lunch for you!)

Waffle recipe No:1

1 cup flour
1/4 cup corn flour
1/2 tsp baking powder
1/2 tsp baking soda
1/2 tsp salt
1 cup butter milk
1/4 cup milk
6 tbsp oil
1 egg
4 tbl spn sugar
1 tsp Vanilla

1, To make butter milk, add a table spoon of vinegar to 1 cup of milk and keep it for 15 mints
2. separate the egg white and yolk. In a fairly large bowl, beat the egg white, till the egg white forms a peak, when you lift the egg beater out.
3. Add the sugar in the egg white and beat again
4.add all the other ingredients(plain flour, corn flour,butter milk,plain milk,baking powder soda,salt,egg yolk,oil and the vanilla essence. Beat it well.
5.Heat the waffle maker, brush with oil, pour the batter and cook.


Waffle No:2

1 3/4 cup flour
2 tspn baking powder
1/2 t spn salt
4 tbls spn sugar
3 eggs
7 tbl spn oil
1 1/2 cup milk
1 t spn vanilla essence

Mix all of the above, beat well and cook

Waffle No:3

2 cup milk
2 t spn yeast
1/2 cup sugar
2 cups flour
1/2 cup oil
1/4 t spn salt
2 eggs.

1. Heat milk to blood heat( ie when you dip your finger in the milk, it shouldn't be too hot or too cold. Yayamma, please don't cook your fingers!
2. add the yeast and a tbl spn of sugar. Keep it aside for 5 minutes
3When the yeast is frothy, add the eggs, oil, rest of the sugar,salt and the flour and mix well.
4.Keep aside for 30 mints in a warm place.( Mama keep it in the oven with the pilot light on)
5. Batter is now ready to cook. You can also do upto level 3 and keep the batter in the fridge overnight and make yummy waffles in the morning

Note: If there is any left over waffles, place them in a ziplock cover and freeze. When you want to eat it, just zap it in the microwave for a minute! But then again, if you have any left over waffles, you just have to call your brother! Posted by Picasa

Wednesday, January 24, 2007

Chicken soup.

Anytime I asked you what you want me to cook, you would tell me "Chicken soup". I am sure, you drank more chicken soup than any other child on planet earth.
I think it all started with you following me to the Chinese market to buy vege in the morning and when you were about 8 months old you started drinking the plain soup that came with the kon lau mein that I used to eat for breakfast at the market.
From then on, you were hooked to soup. Of all the soups I made for you, this tomyam flavoured soup is your favourite and it is very easy to make.
Ingredients
2 boneless skinless chicken breast cut in to strips
2 stalks of lemon grass
1/2 of an onion
5 kaffir lime leaves
1 red chilli
2 cloves of garlic
2 table spoon almond flakes
3 cups of water
2 table spoon oil
1 tbl spn knorr chicken stock
1 tbl spn lemon juice
garnish
2 packets of glass noodles
2 eggs boiled
one handful of bean sprouts

Masala


what you see in the picture from clock wise direction
1/2 of onion,2 stalks of lemon grass, 5 kaffir lime leaves, 1 inch piece of galangal, 1 fresh red chilli and 2 cloves of garlic


Before you use lemon grass, you need to cut the top off leaving only about 3 inches of the base. Remove the first two layers of the lemon grass. That is already dry and there is no point using it.
Mama do not like to blend lemon grass as I don't like to bite in to it. So use the back of the knife and whack the lemon grass a few times to bruise it, that will help the flavour to come out of it. Keep it aside

Blend all of the other ingredients,(onion, kaffir lime leaves, galangal,chilli and garlic along with 2 table spoon of almond flakes in 1 cup of water.

Heat 2 table spoon of oil in a pan and add the ground mix and the lemon grass. Keep stirring. After about 10 minutes of stirring, you will see the oil floating on top. Now add 2 cups of water and 1 table spoon of knorr chicken stock. When the soup starts to boil, add chicken cut in to slices, a table spoon of lemon juice and salt to taste. Boil for about 20 minutes.

While the soup is boiling, get the accompaniments ready.
1.Boil the eggs. ( add a pinch of salt in the water you are boiling the egg, it prevents the egg white from leaking out!. Mama prefers to boil the eggs for 15 minutes)
2.soak the glass noodles( bean thread noodles) in hot water for 5 minutes and drain
3. Wash the bean sprouts and trim the edges.

To serve

Take the glass noodles in a bowl, pour the hot soup on top, garnish with bean sprouts and slices of boiled egg


For Yaya
6 months from Now, you will be celebrating your 9th birthday. Mama thought and thought as to what would be the best gift to give to the best daughter in the whole wide world.
Then I remembered all the times, you and I spend in the kitchen and how much you love to cook. This blog is mama's gift for you.
I will blog the recipes of all your favourite food. So you can cook them, even when you are far away from me and remember all those times we spend together.